I’ve gone hands on with the Veritas MK II Honing Guide. Find out my opinion about it in this in-depth review.
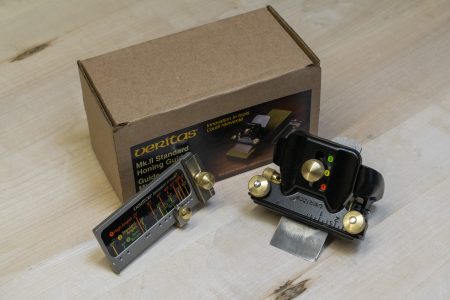
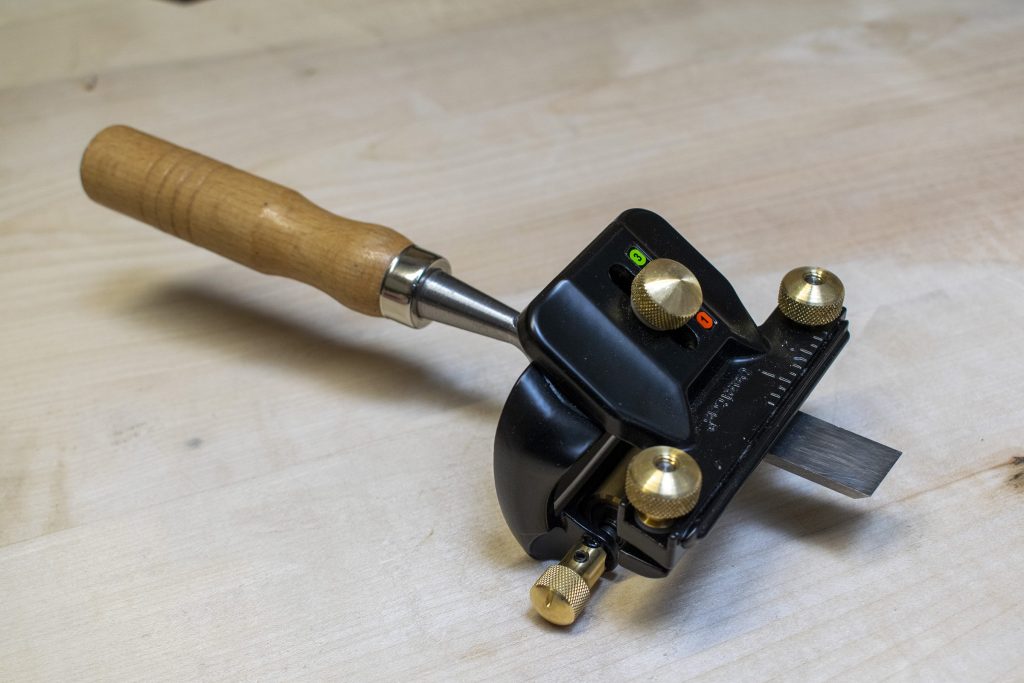
The version I got is the Standard Mk.II Honing Guide, which consists of two parts, namely the honing guide itself and the angle setting jig.

The first step is to pick the angle that you want for your chisel or plane blade. Depending on the angle, you can pick one of three settings on the honing guide itself, one for low, one for medium, and one for high angles. These have some overlap, and can handle angles ranging from 15° to 54°.
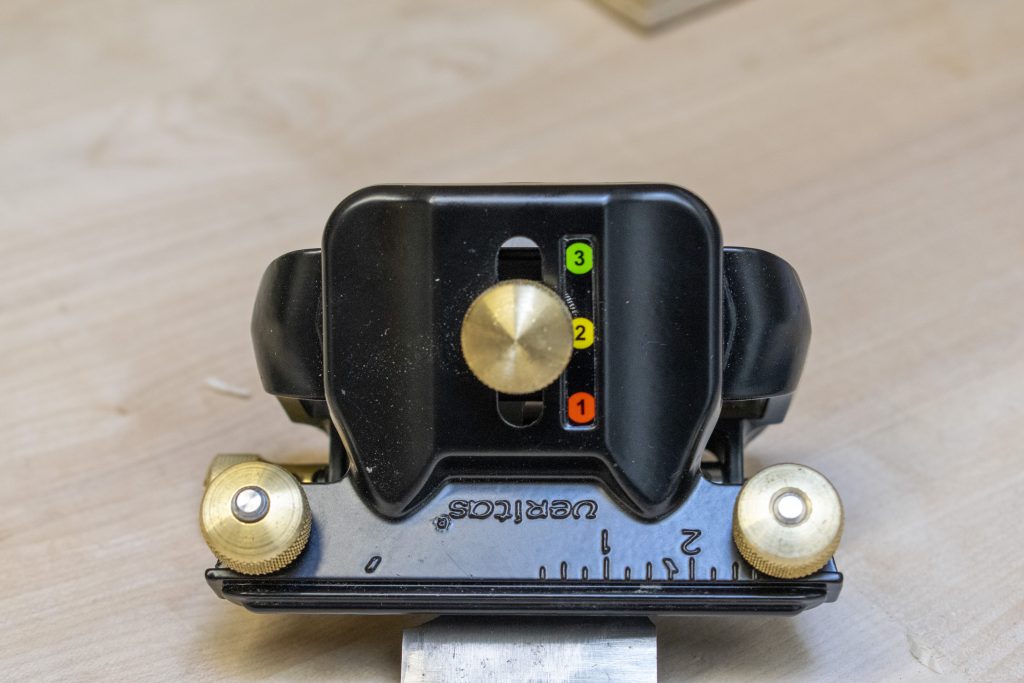
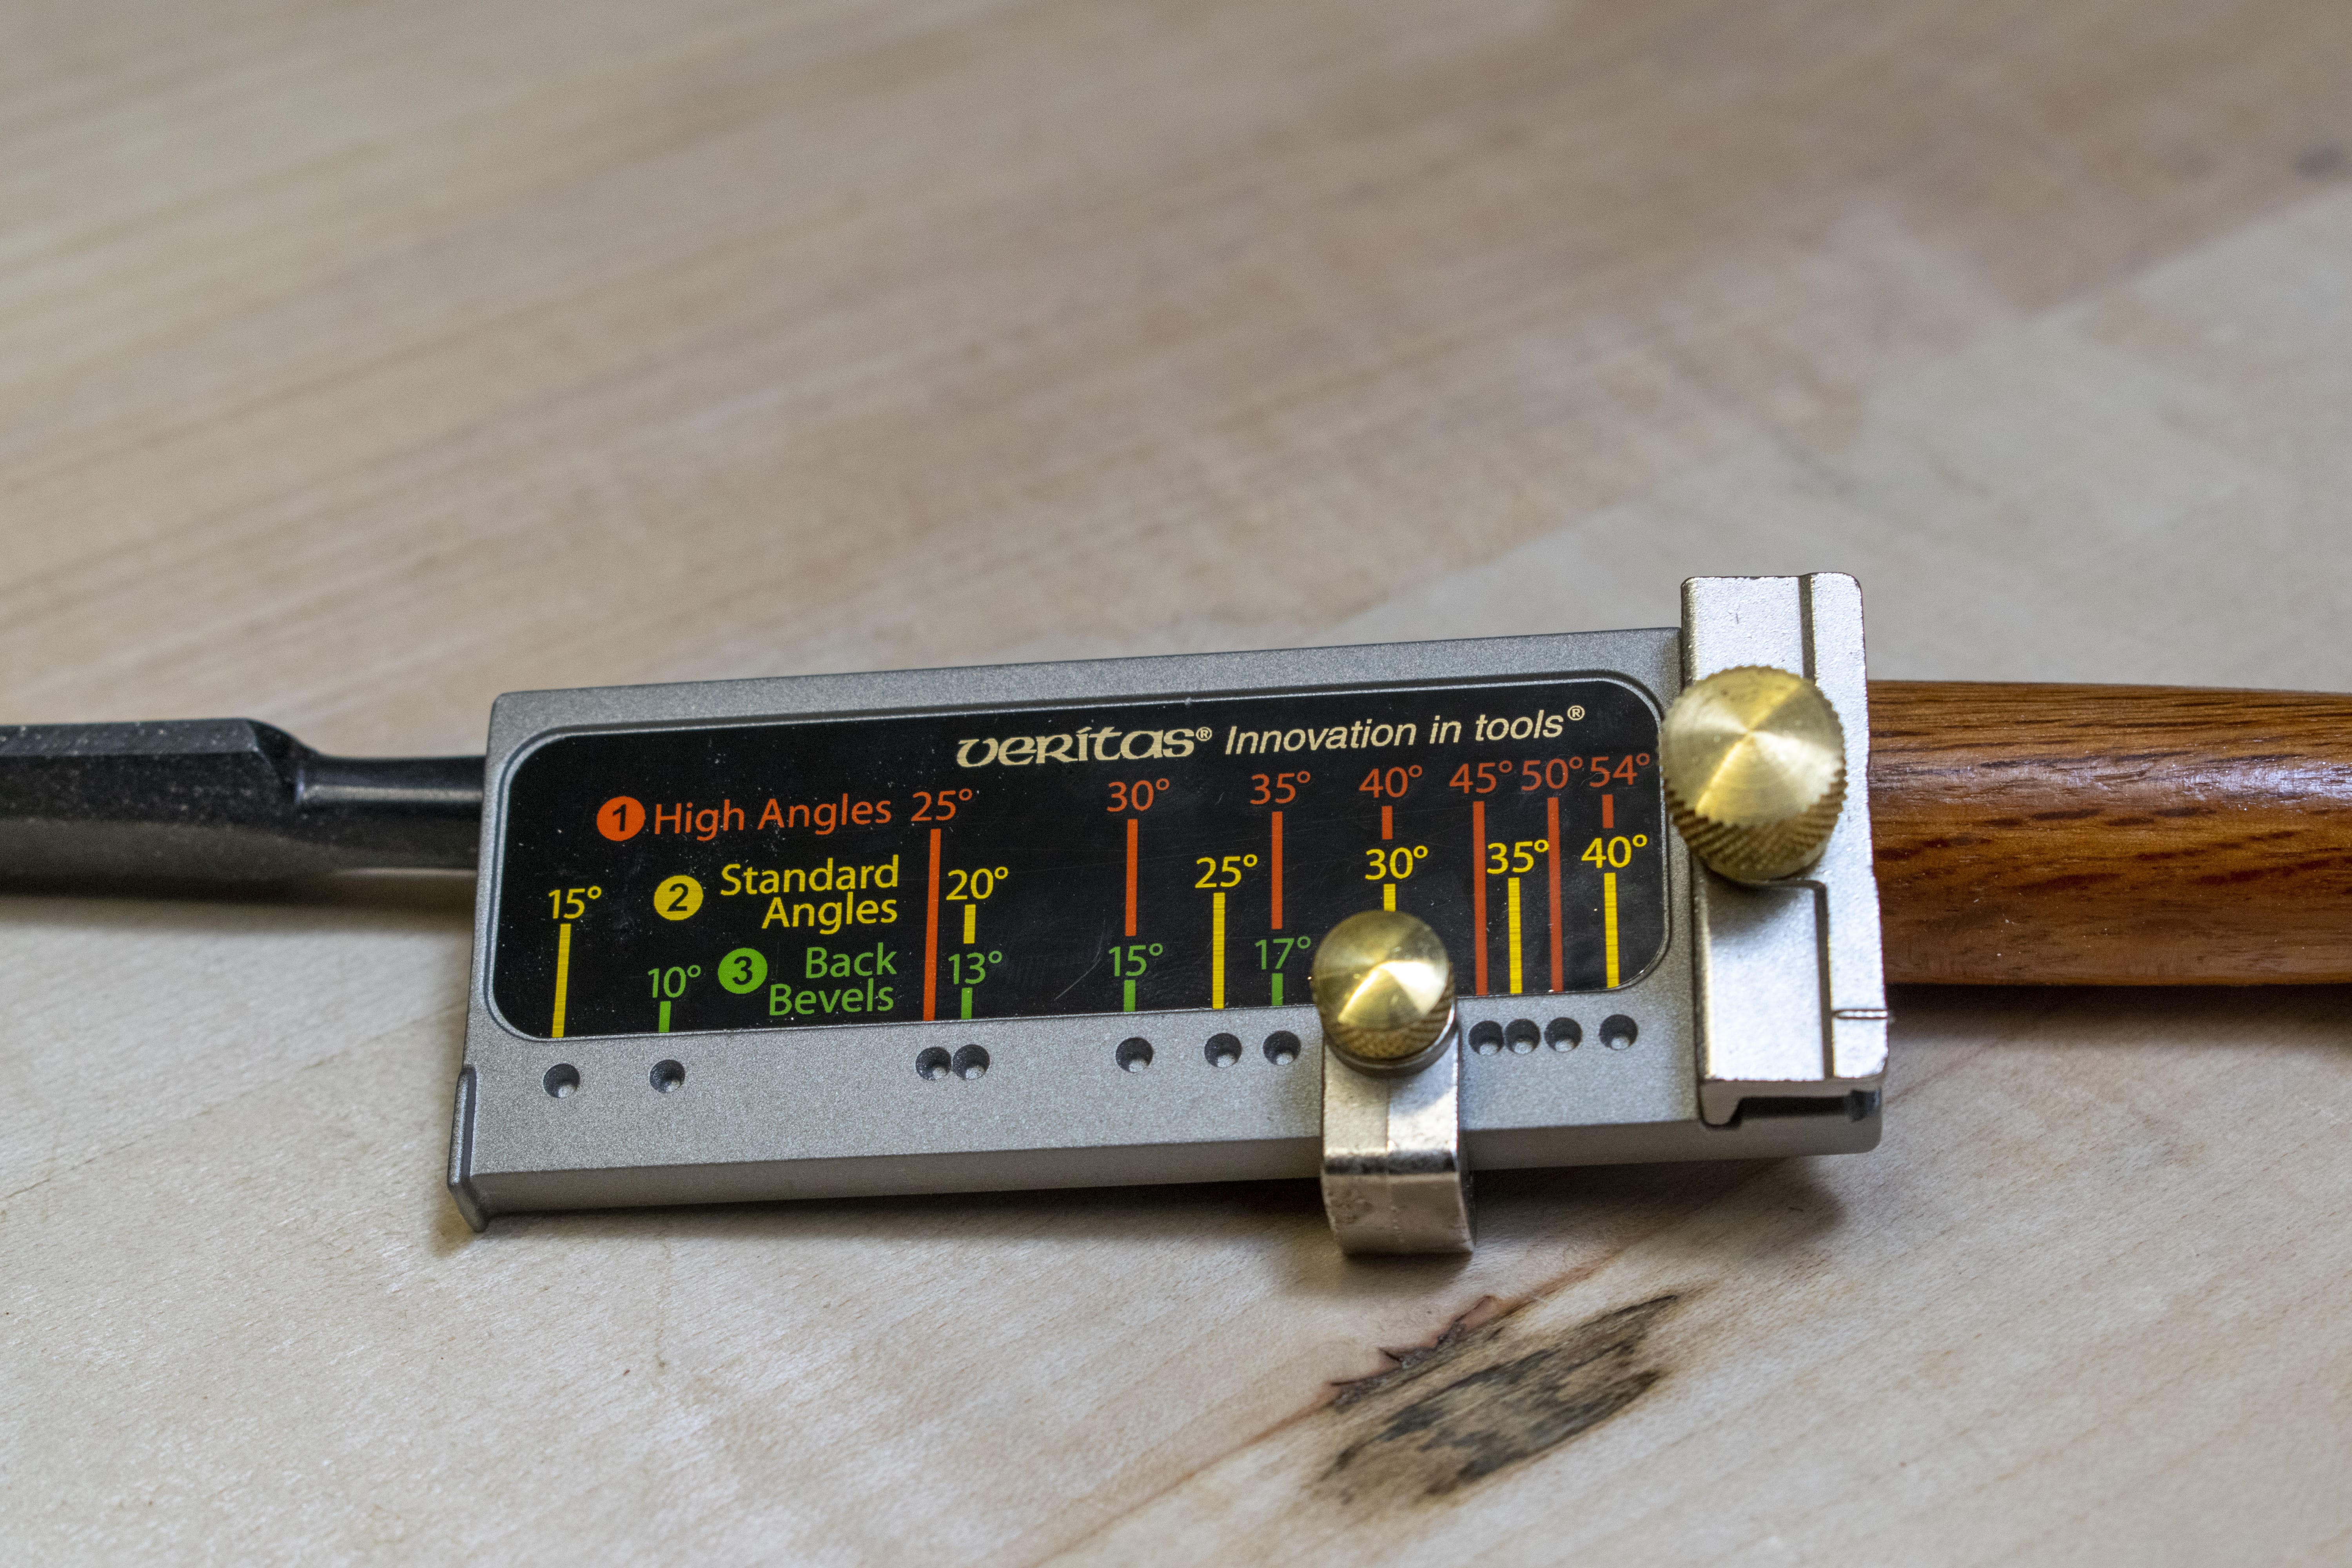
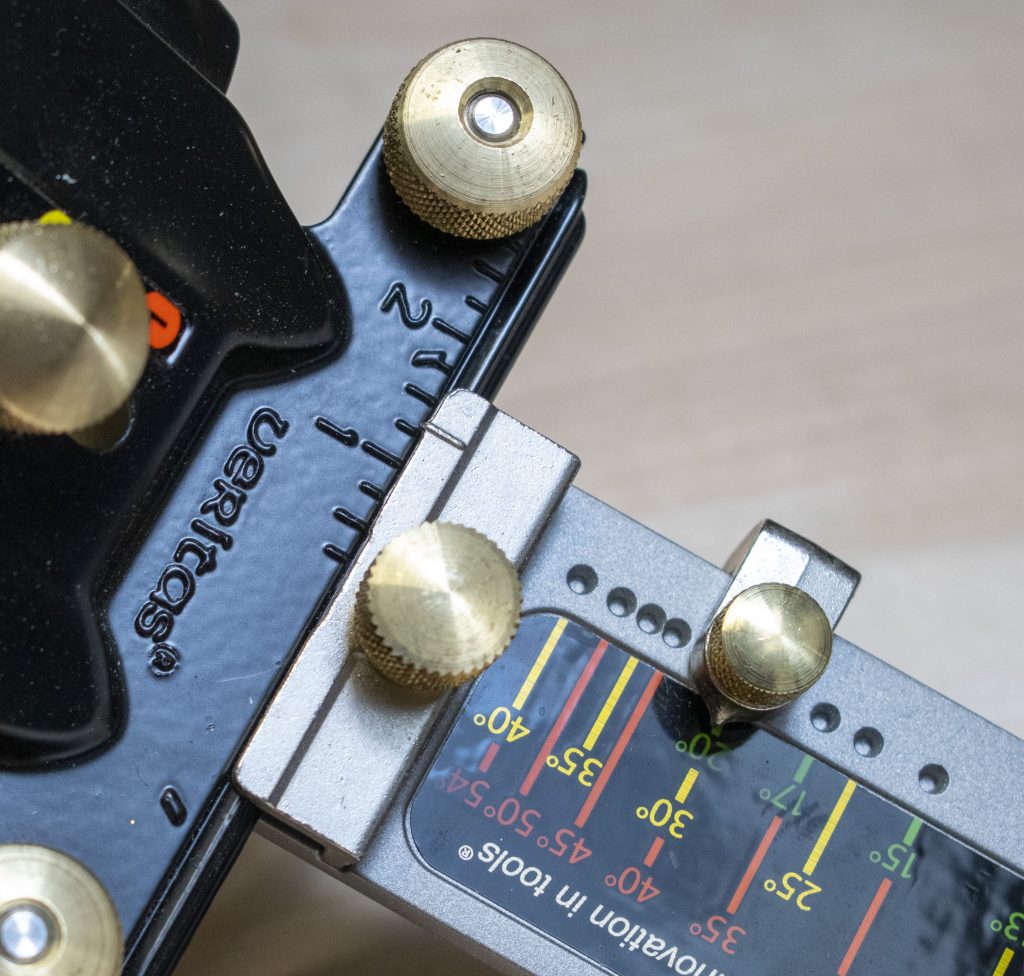
The second step is to then select your chosen angle on the angle setting jig. You’ll need to pick the color that corresponds to the setting you chose on the honing guide (green for low, yellow for medium, and red for high angles). This is done by screwing a brass knob tight.
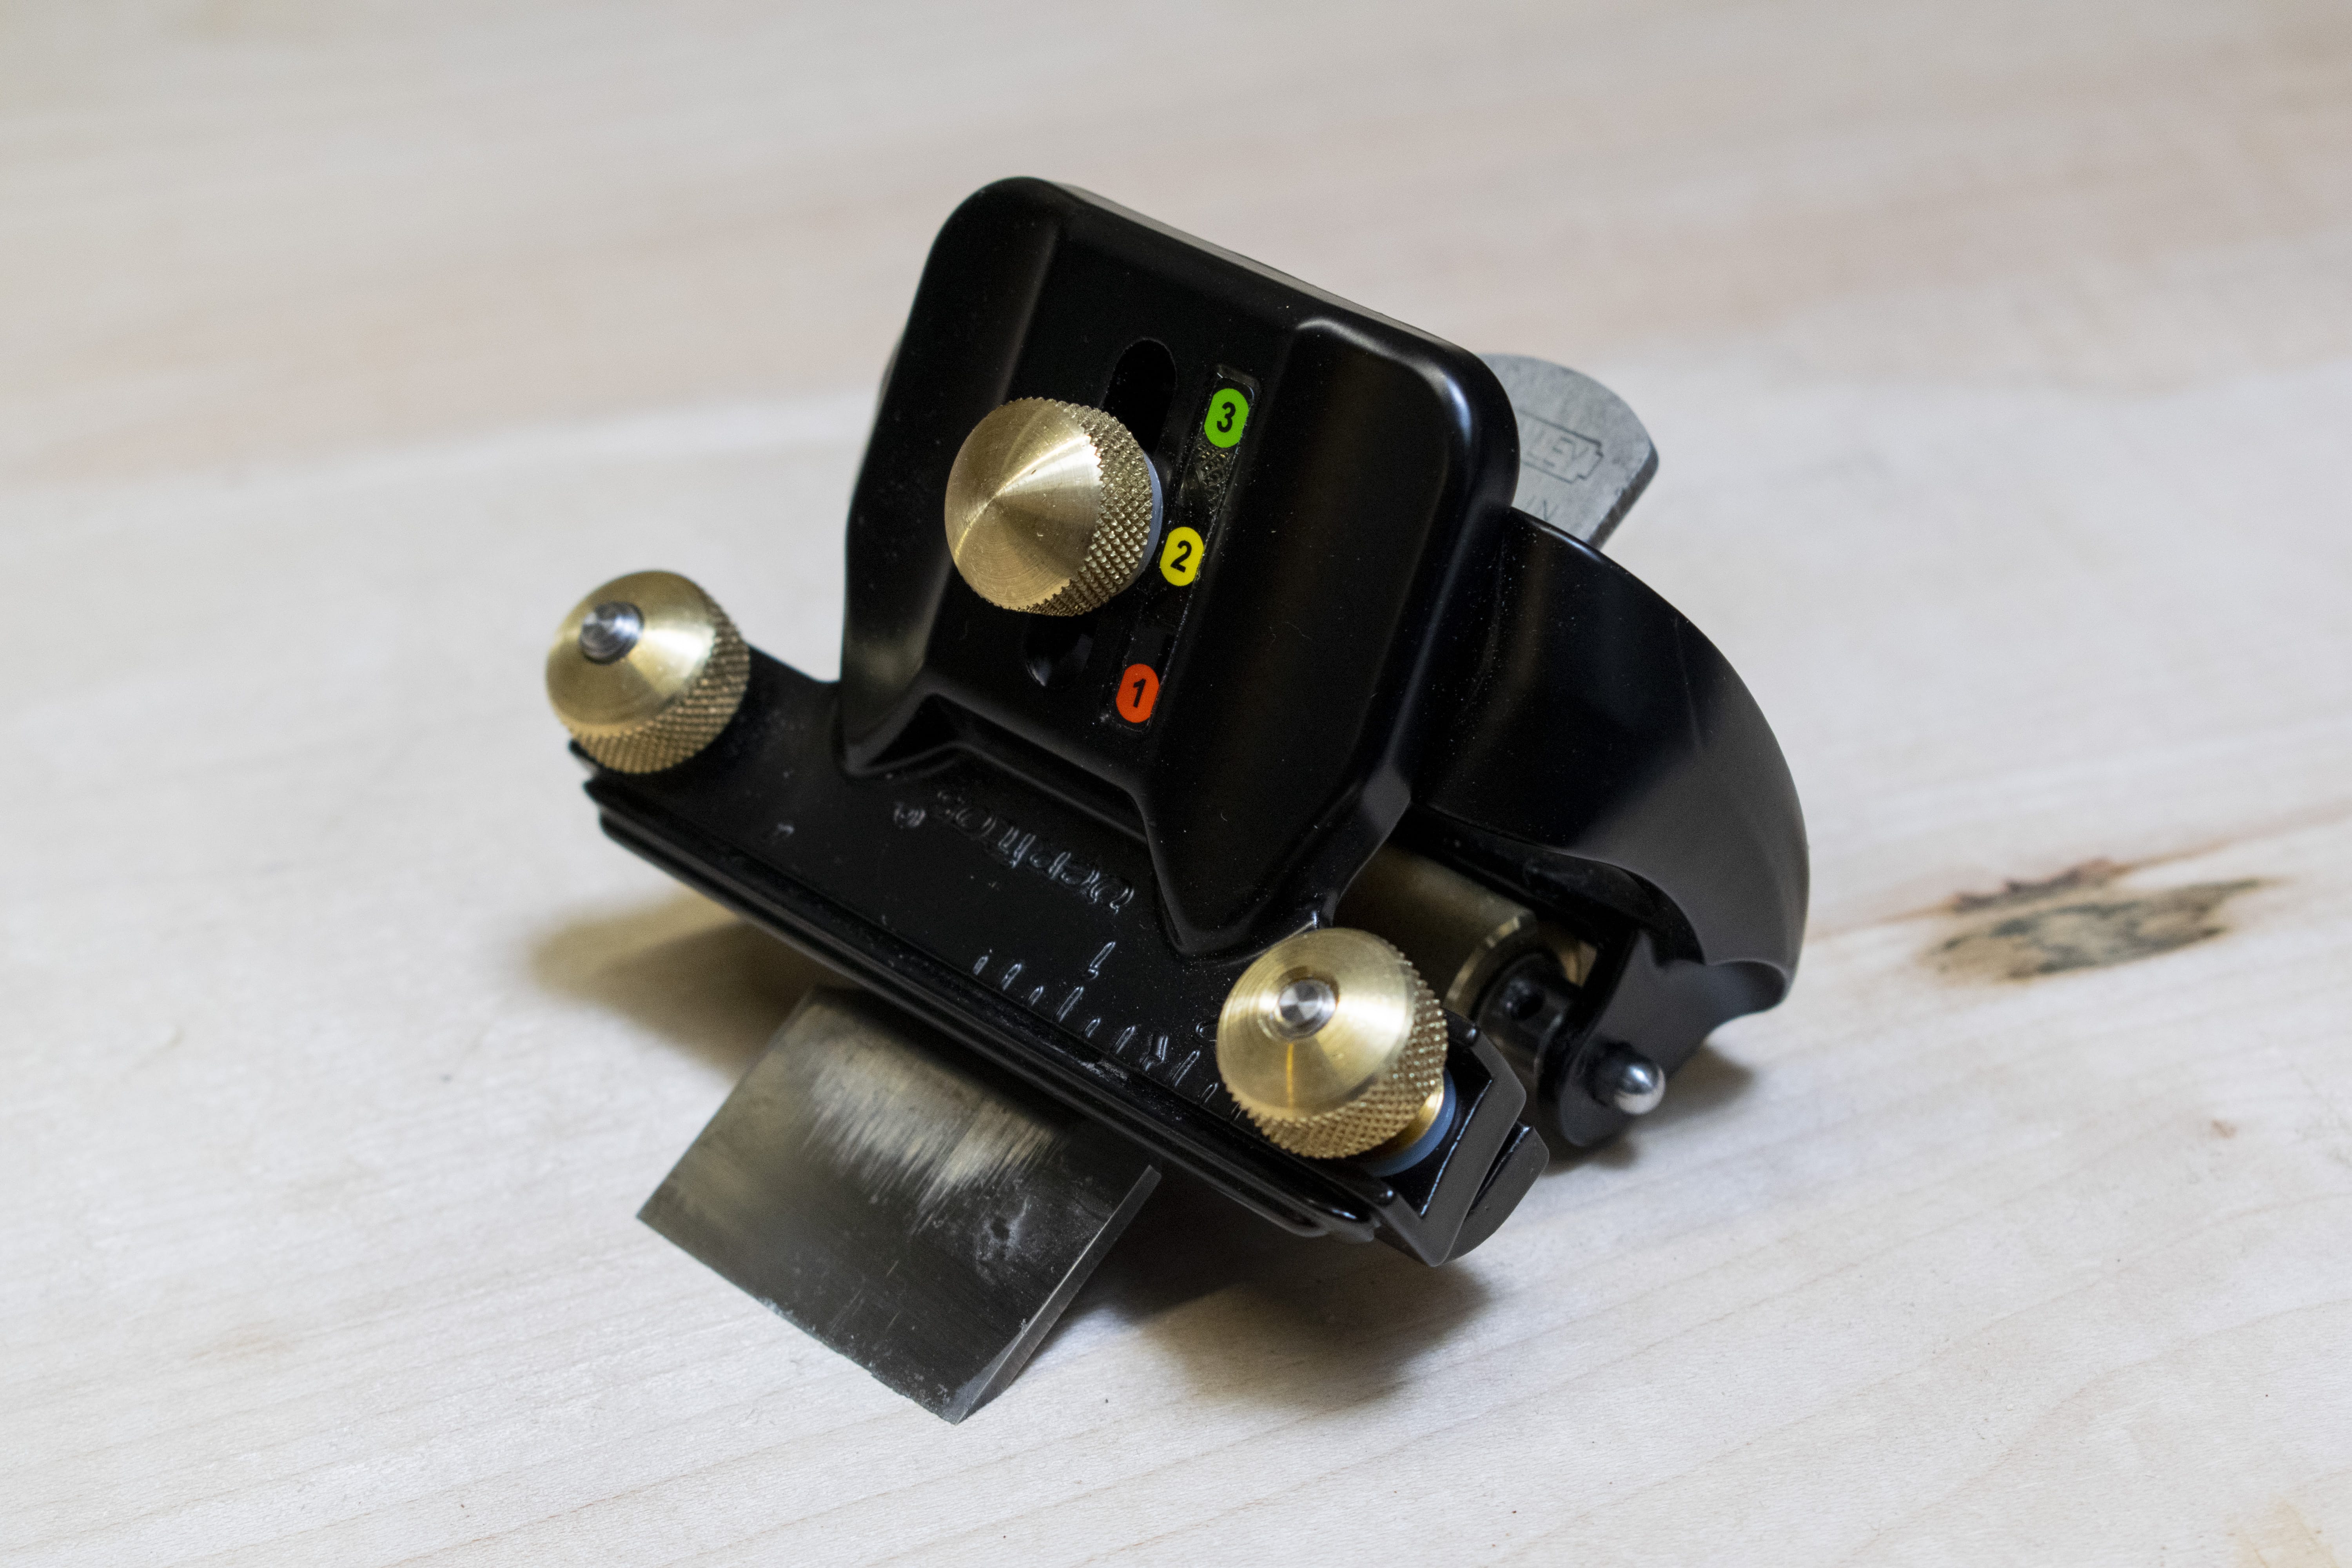
Then it is time to attach the angle-setting jig to the honing guide, which you do by sliding it over a dovetail bar. Lock it in place by screwing the brass knob. There is an indicator that you line up with a short scale that corresponds to the width of the blade or chisel you are going to sharpen. This ensures the blade is positioned in the middle of the guide, which makes it easier to put even pressure when sharpening.
The next step is to put the blade through the clamp head, with the flat side facing the angle-setting jig. The side of the blade should be flush with the side of the angle registration jig. This ensures that you will be sharpening at an exact 90 degree angle from the side of your blade. If you would not do this, you would end up with a skewed blade.
Now it is time to lock the blade in position. You do this by tightening two brass knobs on the clamp head. This is the tricky bit, because you have to turn the whole guide around to tighten the knobs. While doing this (especially at the start) I found that often the position of the blade shifted a little when I turned the guide upside down.
It took a few tries to get used to, but now I can tighten the clamp head quite effectively, without any movements in the blade position. So although it is a bit finicky, I wouldn’t consider it an actual problem or downside.
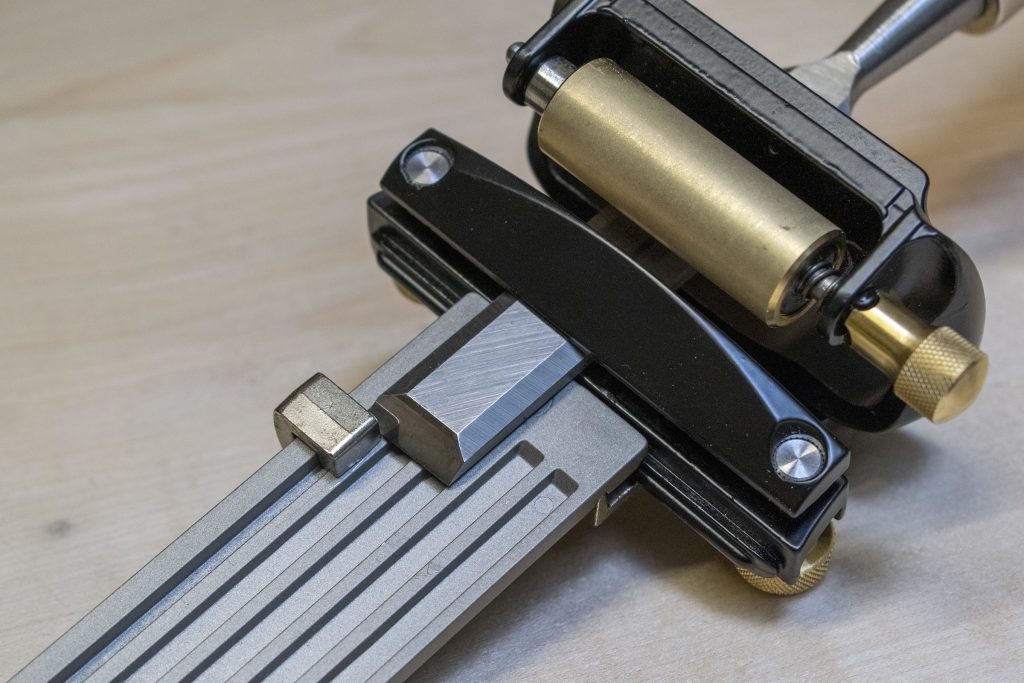
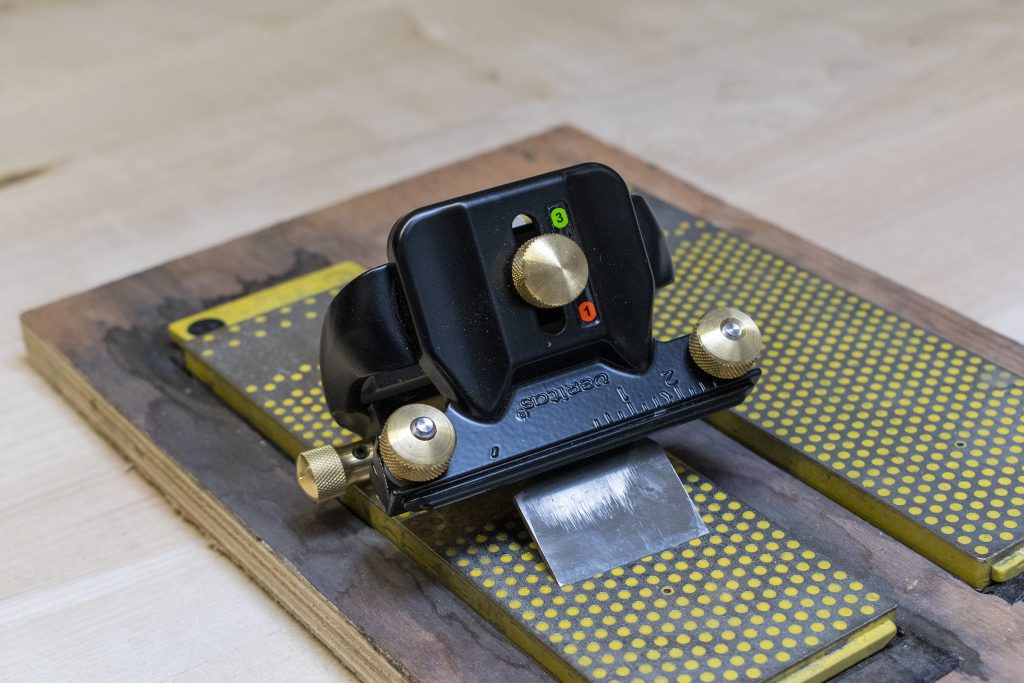
Now the honing guide is ready to be used. Simply roll it back and forth over your stone to start sharpening.
Another feature of the Mk II Honing Guide is that you can quite easily add micro bevels. Thanks to the eccentric shape of the roller, you can add a few degrees to your bevel with the twist of a knob.
I don’t use micro bevels myself, but some people swear by them. Their main advantage is that you don’t need to remove as much material when honing your blade, making it easier and faster to get your blade back to full sharpness.
There is much good to be said about the Veritas Honing Guide Mk II. To start, the build quality is excellent, with the brass knobs and cast iron body. The whole thing feels sturdy, without being too heavy. It is light enough for you to move it smoothly over sharpening stones. It feels like it might last for a lifetime. The only thing you will probably need to replace at some point is the roller, but a replacement roller is only about $10.
The second thing I really like about this honing guide is that it does everything you want it to do. Some other honing guides (especially the cheap ones) don’t provide a way to set specific angles, meaning you have to make jigs yourself. They also don’t guarantee squareness, meaning you have to test for square yourself every time.
The Veritas does both things, making it extremely convenient to set up. That’s also how I see this jig, not as absolutely essential, but as a tool that makes it way more convenient to do woodworking. It gives you peace of mind that the tool you are sharpening will be the right angle and nice and square.
I’m able to do freehand sharpening as well, but I find myself constantly checking for square and for the right angle. This makes it a much more tedious and frustrating process.
Another thing I like are the ergonomics. It is simply much more comfortable to your hands to use than freehand sharpening. There is a bar at the back on which your thumbs can rest, while the tips of your index or middle fingers put downward pressure on the blade.
Simpler Eclipse-style honing guides lack space to put your hands, which forces your hands into a cramped up position that is very tiring when sharpening for longer periods of time. That said, this jig does not make the metal on your blades remove any faster, so sharpening for a long time still remains a tedious process. At least your hands won’t be as sore!
Something else that makes this tool excellent is the price. It is much cheaper than a comparable jig from Lie Nielsen. Given that you will probably use this honing guide for many years, it is not that big of an investment. However, if you also want to be able sharpen narrow chisels, it becomes a bit more expensive, but I’ll touch upon that in the next section.
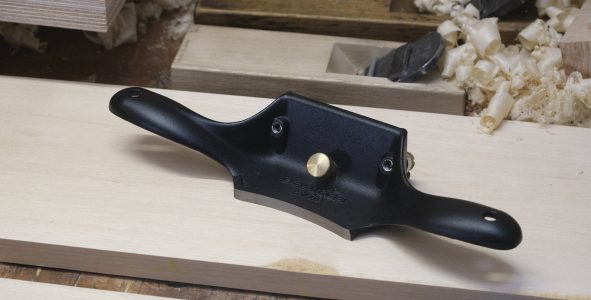
There are two main downsides to the Veritas Honing Guide Mk II. The first is that to sharpen very narrow chisels, you’ll have to buy a second clamp head, which almost doubles the cost of the guide. To be able to sharpen mortise chisels, you’ll have to add a third clamp head, making the system as a whole even more expensive.
I recently got my hands on the narrow clamp head, and it works great. Not just for chisels but also for thinner plane blades like low angle block planes. It does much better with chisels than the regular clamp head. Can strongly recommend getting this as well.
The second downside is that if your chisels or plane blades are either very short, or are tapered, like is the case with Japanese chisels, they won’t stay put in the clamp head. Due to tapered top of Japanese chisels, the clamp head can only put pressure on one very thin line, allowing the chisel to move when you sharpen it.
The Veritas Honing Guide Mk II is an excellent tool, and a class above most cheaper guides. It can be a bit fiddly to set up at first, but when you know how to use it, you can get your blade ready to hone within a minute.
It is easy to set the angle you want, easy to align your blade to be square, and comfortable to use. It is also not too expensive, being about half the price of the more barebones Lie-Nielsen honing jig. All-in-all, the Veritas Honing Guide offers great value for money, and is a great help especially to beginning woodworkers who find freehand sharpening daunting.
I bought mine at a local Dutch store, but these are some good places to buy the Veritas honing guide:
Tip: If you enjoyed this review, be sure to also read my review of the Veritas Router Plane and Veritas Cabinet Scraper!
I hope you found this review helpful. If you have any feedback, or maybe you have a different opinion of this honing guide, let me know in the comments below! I’ll try to respond to every comment.
How good is the Veritas Cabinet Scraper? Great build quality and ergonomic, capable of producing fine shavings like a smoothing plane.
Made in the USA, lightweight, powerful, and great clamping force, what’s not to like about these clamps?
How good is the new Metabo TS 254 M table saw? I’ve gone hands on and share my experiences in this review.
Is the Festool Domino an essential tool for every woodworker? Find out in my in-depth review.
© Machine Atlas 2026
There are no comments yet, be the first to leave one!
Every comment on MachineAtlas is read and answered. And if you know some useful info or tips, please share them. You could really help out some fellow woodworkers!